Overview
This is a quick overview as a companion document to video tutorial linked below.
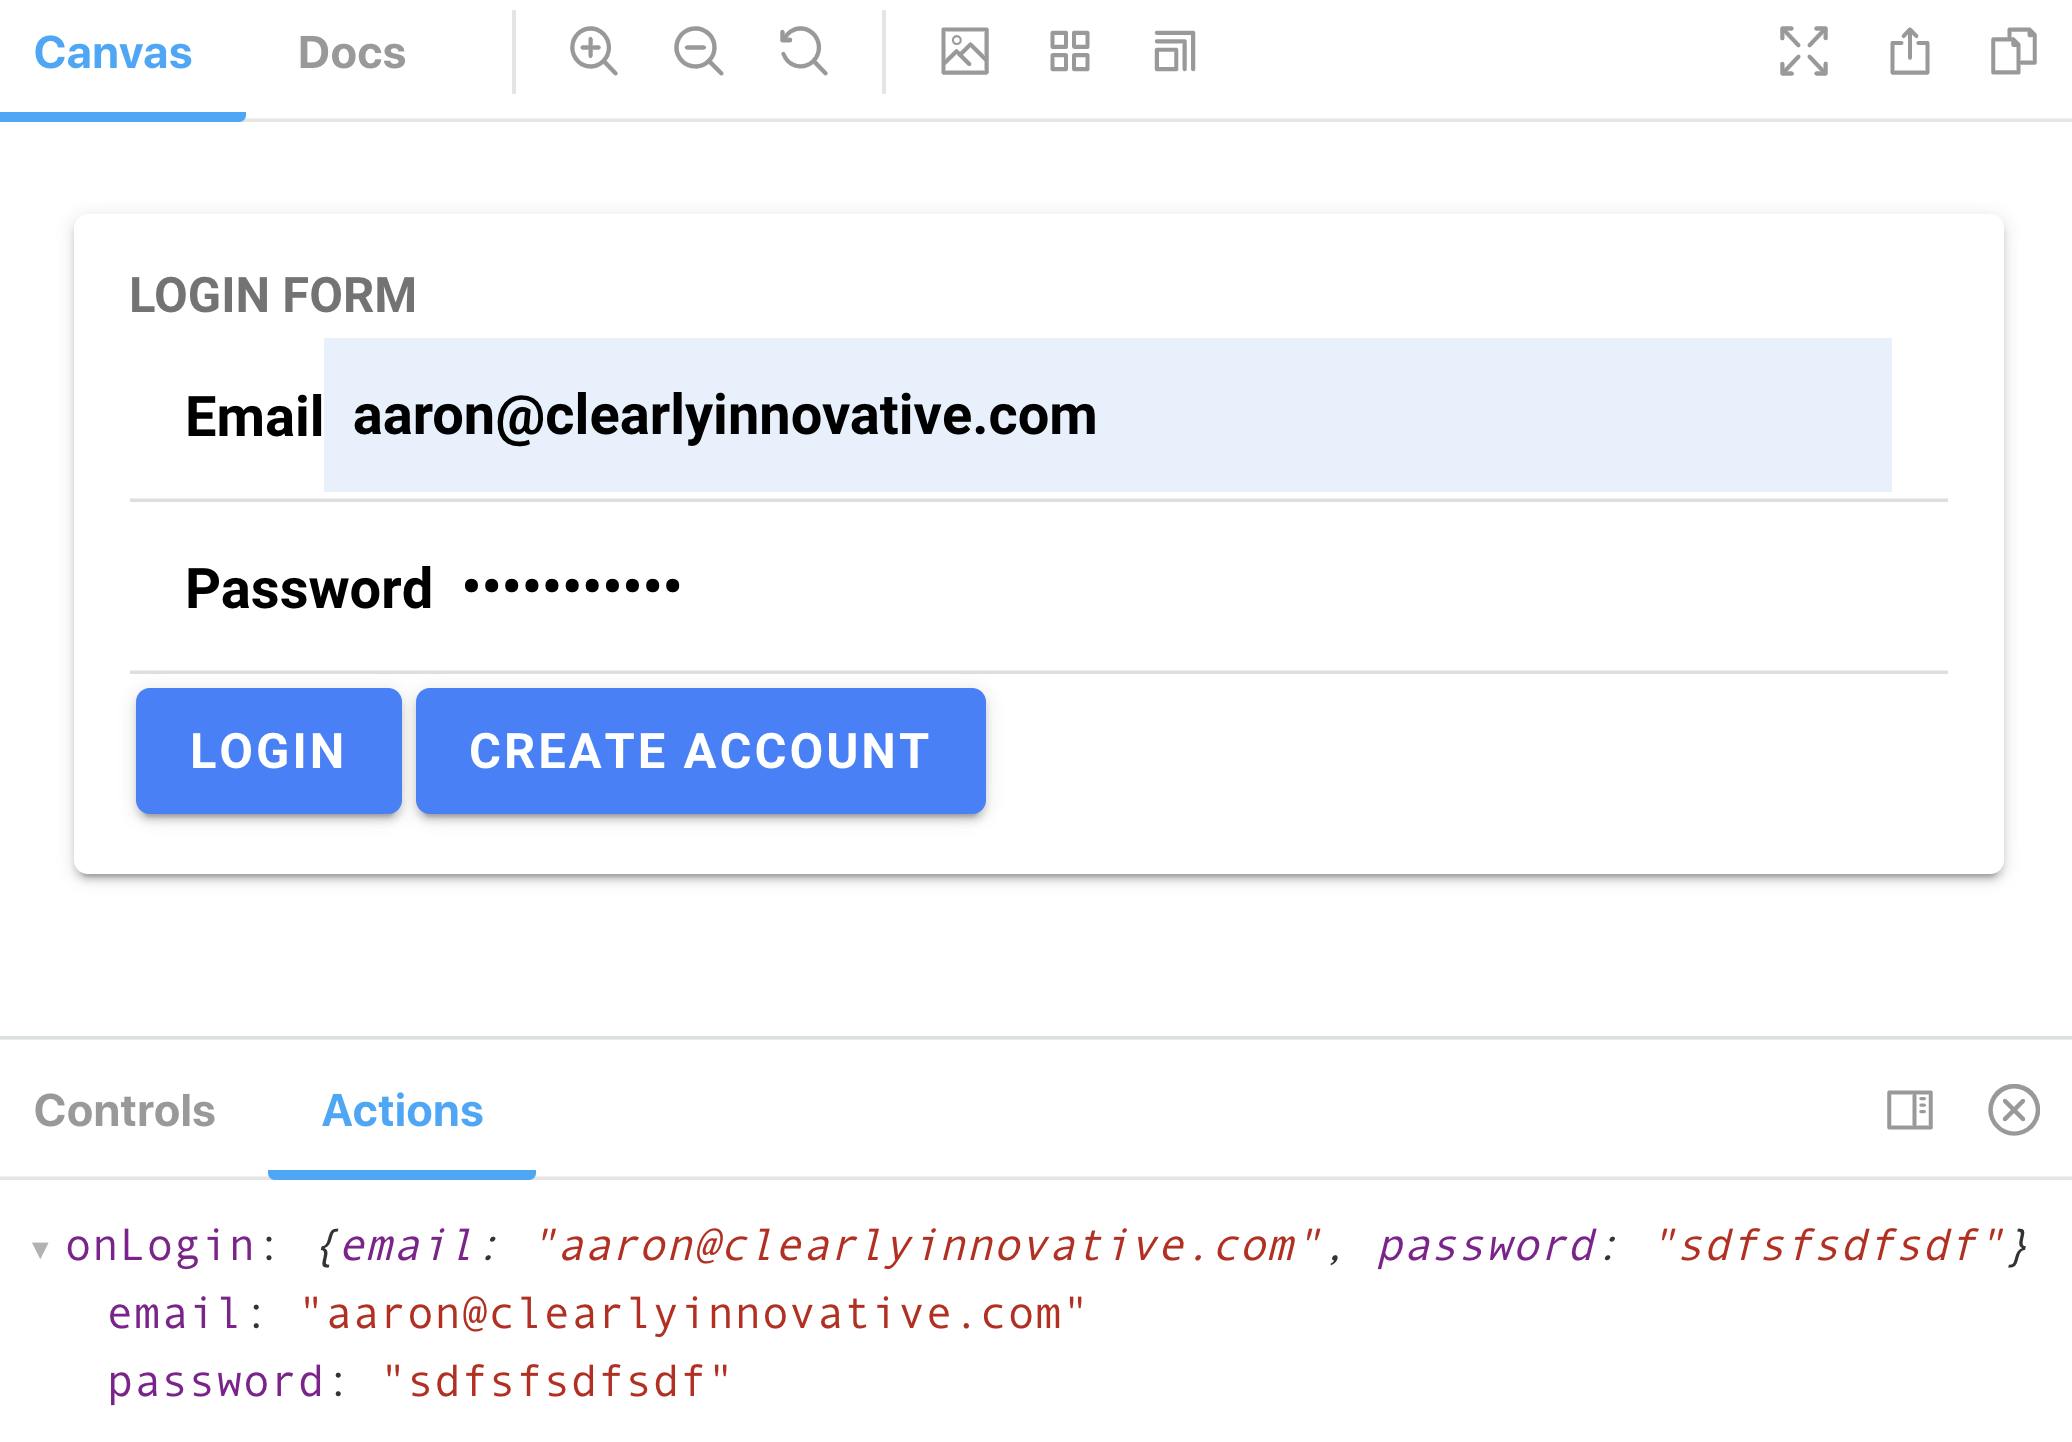
We will create a story for a LoginForm component with two input fields that emits events for login and create account.
There are a few extra steps that you need to follow to get your Ionic Vue project working together with Storybook and luckily once you get Storybook project configure for your first story, you are good to go for the remainder of the stories you create.
Lets Go
Install storybook at the root of your project and launch it.
npx sb@next init
npm run storybook
We need to add the ionic styles to .storybook/preview.js so that we get the look and feel along with the default theme applied to all of the stories in the project
/* Core CSS required for Ionic components to work properly */
import '@ionic/vue/css/core.css';

/* Basic CSS for apps built with Ionic */
import '@ionic/vue/css/normalize.css';
import '@ionic/vue/css/structure.css';
import '@ionic/vue/css/typography.css';

/* Optional CSS utils that can be commented out */
import '@ionic/vue/css/padding.css';
import '@ionic/vue/css/float-elements.css';
import '@ionic/vue/css/text-alignment.css';
import '@ionic/vue/css/text-transformation.css';
import '@ionic/vue/css/flex-utils.css';
import '@ionic/vue/css/display.css';

/* Theme variables */
import '../src/theme/variables.css';
We need to do some additional setup to get our stories wrapped with IonApp and ensure we get the IonicVue injected into the app.
What is going on below is that we are importing the ionic components we need, IonApp and IonVue and then utilizing the app object we get from storybook along with the decorator; we are creating a container to render the story that has IonicVue injected and wraps the story with IonicApp.
We could have done this at the story level, but since we know that all of our stories will need to be wrapped; I did it at the top level of the project
we need to add the changes to .storybook/main.js
// IONIC SETUP
import {IonApp, IonicVue} from "@ionic/vue"

import { app } from '@storybook/vue3'
app.use(IonicVue)

export const decorators = [
  (story) => ({
    components: { story, IonApp },
    template: '<ion-app><story/> </ion-app>'
  })
];
Part of the magic of the story is getting events from the component emitted so you can verify the component is working as expected.
In this component we need to know when the user has clicked the login button or the create account button. We also need the contents of the form fields passed along with the event.
Our LoginForm will emit two events login and createAccount ; in order to get the events converted to actions that we can see inside of storybook, we can use "Action argType annotation"; which basically turns the argument into an action that can be displayed in storybook console
    argTypes: {
      onLogin: { action: "onLogin" },
      onCreateAccount: { action: "onCreateAccount" },
  }
all arguments from the story are bound to the component in the storybook container
<div class='ion-padding'><login-form v-bind='{...args}'/></div>
See the documentation https://storybook.js.org/docs/vue/essentials/actions#action-argtype-annotation
final story src/stories/IonicTest.stories.js
// import the component for use in story
import LoginForm from "../LoginForm.vue";

// set up the story container
export default {
  title: "Example/LoginForm",
  component: LoginForm,
    argTypes: {
      onLogin: { action: "onLogin" },
      onCreateAccount: { action: "onCreateAccount" },
  },
};

// create the base template
const Template = (args) => ({
  components: { LoginForm },
  setup() {
    return { args };
  },
  // Then, those values can be accessed directly in the template
  template: "<div class='ion-padding'><login-form v-bind='{...args}'/></div>",
});

export const Basic = Template.bind({})

final code for LoginForm.vue
<template>
  <div>
    <h2>
      LOGIN FORM
    </h2>
    <p>
      <ion-item>
        <ion-input type="text" v-model="credentials.email" />
      </ion-item>
      <ion-item>
        <ion-input
          type="password"
          v-model="credentials.password"
          autocomplete="new-password"
        />
      </ion-item>
      <ion-button @click="handleLogin">LOGIN</ion-button>
      <ion-button @click="handleCreateAccount">CREATE ACCOUNT</ion-button>
    </p>
  </div>
</template>

<script lang="ts">
import { IonButton, IonInput, IonItem } from "@ionic/vue";
import { defineComponent, ref } from "vue";
export default defineComponent({
  name: "LoginForm",
  emits: ["login", "createAccount"],
  setup(props, { emit }) {
    const credentials = ref<any>({
      email: "",
      password: ""
    });

    return {
      credentials,
      handleLogin: () => emit("login", { ...credentials.value }),
      handleCreateAccount: () => emit("createAccount", { ...credentials.value })
    };
  },
  components: {
    IonButton,
    IonInput,
    IonItem
  }
});
</script>

<style lang="scss" scoped>
</style>
This is the final code for the Home.vue component that the LoginForm is contained in
<template>
  <ion-page>
    <ion-header :translucent="true">
      <ion-toolbar>
        <ion-title>Blank</ion-title>
      </ion-toolbar>
    </ion-header>

    <ion-content :fullscreen="true" class="ion-padding">
      <login-form @createAccount="doCreateAccount" @login="doLogin" />
    </ion-content>
  </ion-page>
</template>

<script lang="ts">
import {
  IonContent,
  IonHeader,
  IonPage,
  IonTitle,
  IonToolbar
} from "@ionic/vue";
import { defineComponent } from "vue";
import LoginForm from "./LoginForm.vue";

export default defineComponent({
  name: "Home",
  components: {
    IonContent,
    IonHeader,
    IonPage,
    IonTitle,
    IonToolbar,
    LoginForm
  },
  setup() {
    return {
      doLogin: (params: any) => {
        console.log("doLogin", params);
      },
      doCreateAccount: (params: any) => {
        console.log("doCreateAccount", params);
      }
    };
  }
});
</script>

<style scoped>
</style>
Video
Source Code
💥 Additional Content
- 🎓 Udemy Courses - udemy.com/user/aaronsaunders
- 🎓 Gumroad Courses/Content - gumroad.com/fiwic
💥 Social Media
- YouTube Channel, With Over 150 videos on Ionic Framework
- Twitter - twitter.com/aaronksaunders
- Facebook - facebook.com/ClearlyInnovativeInc
- Instagram - instagram.com/aaronksaunders
- Devto - dev.to/aaronksaunders
- 🌐 fiwic.com
